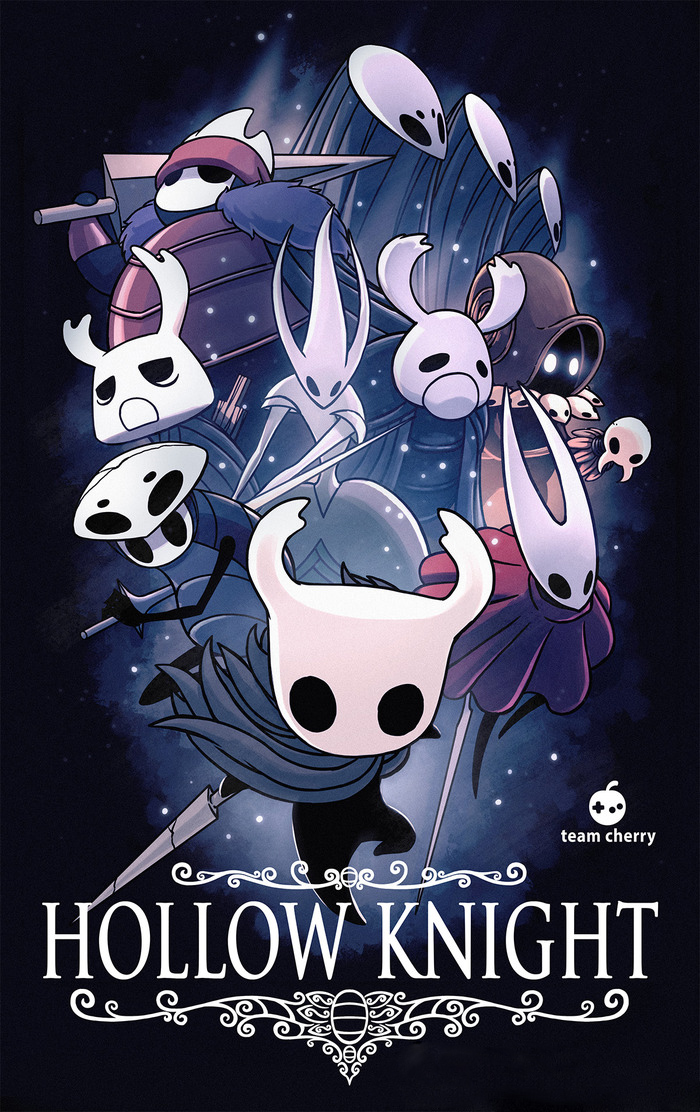
During the recent steam sale I picked up a bunch of games, and Hollow Knight had been vaguely on my radar since a friend mentioned it, so in it went. I wasn't really prepared for how much I ended up loving this game. The huge and story-drenched world, fluid movement, skill-testing combat, interesting mechanics and choices.. I could go on at length, but it suffices to say that I got really into it! This led to the inevitable outcome of me nerding out over a particular thing: making one or more things about it.
A bleached shirt has become my obvious first step. I found this poster while looking around for source images, and really loved how it feels like the old 80's movie posters with all the characters montage'd together (e.g. the Star Wars films have stuck with this throughout the years). What I didn't consider was how much higher the level of detail was compared to previous shirts I've made, even after simplifying the design a bit, it had more than 150 "islands" that needed to be placed. Rather than the hour or so I normally budget for ironing down the pattern, it took about 8 hours across several evenings to get it right, and several lost pieces had to be re-cut by hand. That said, I'm super happy with how the final result looks!
Pattern as-ironedBleached result!
My partner, watching (and hearing) me play just so many hours of Hollow Knight, decided to give it a try. After making it through the first chunk of the game, she was hooked too, and wanted to craft something. One of her fortes is sculpture, so we dug out the polymer clay and got to work! I took a shot at the Wanderer (the player character), which came out reasonably well, but the Hornet she made looks amazing.
Note - I'm working on getting all the stencils I've generated into a consistent format, as I do intend on posting them here! It could take a bit, but I wanted to get these shirts and the process post up this weekend. Also, I definitely don't own the original images, they're posted here only for illustration / education purposes.
These might be the last shirts for a while, been on a bit of a tear with them lately. The shirts used for these two (depicting Etched Oracle and Sheoldred, Whispering One) were Hanes Premium X-Temp V-necks, which yielded a more orange color when bleached. To not bury the lede too much, here are the final results!
At this point I've settled into a workflow for generating designs from art, which breaks down into five steps -
Original art - Etched Monstrosity
First, isolate the subject. In GIMP I end up using the lasso-select tool and color-select tool as necessary to delete the background. This can take a while if the edges are hard to see, or if the subject blends slowly into the background, like Sheoldred does.
Isolated figure
Second, create two new layers. The first is a block of black that fills the entire subject, providing a silhouette for later, but is kept "off" for the intermediate steps. Second, a "highlights" layer that sits at the very top of the stack for providing the "gaps" between pieces. These gaps create depth in the final design by allowing objects to pass behind each other, so it's important to grok how the original image is arranged.
Third, as the art on most cards is cropped by the frame, as need to expand the canvas enough to complete the figure. This usually means adding feet, tendrils, arms, etc. so the finished shirt doesn't have an artificial "frame" imposed on it.
Blocking layer with extensions
Fourth, and most time-consuming, adding the gaps. On the highlight layer I've settled on using 3-5px wide pencil and pen-curve tools to trace out the boundaries of each piece. Inevitably there's some iteration as I apply these at high zoom, and have to zoom out to make sure it all still parses at a distance.
Completed with highlights
Lastly, moving the file (usually in png format) over to Adobe Illustrator, to convert it all into paths. I fell into using the "black and white logo" setting on live trace as it has produced good results so far, but your mileage may vary. The only thing left to do at this point is to expend the resulting object into paths, un-group them, and delete the unnecessary segments. For me, this usually means retained islands of white. If kept, during cutting the laser will attempt to cut the boundary multiple times, isn't ideal.
For the cutter I'm using it expects vector cuts to be 0.01 pt black stroked paths, so I set everything to that and no fill color. I've also found that the speed-power-frequency settings needed to produce good results is about 80/5/2500, on a 150W cutter. After cutting the pieces of freezer paper are taken back home, and the host-shirt is laid out on an ironing board. After centering things up, I can start placing pieces and "gluing" them down with brief contact from a hot iron. Be sure to check you don't iron the wrong side of the paper, it WILL glue itself to your iron. Both of the patterns in this post took about 45-60 minutes to position all the fiddly pieces, tweezers were definitely a must. I've dropped an in-progress shot below.
Placing so many pieces
After it's all ironed down, a plastic poster-holder is slotted into the shirt to prevent bleed-through and bleaching of the back surface, and it's set outside either on the concrete or a protected work surface. I've settled on 4-6 fine sprays, quickly dabbing the excess off of the papered regions with a paper towel, followed by a five minute wait. I did that twice for each of these, followed by a minute or two agitating it a bucket of ice water to halt the bleaching. The water definitely turned orange. Lastly they were both thrown into the washer for a short cycle and dried. That's the whole thing!
This is a short post, but I did want to show off the Phyrexian Obliterator shirt I made, as I managed to get it signed by Todd Lockwood (the original artist) at Emerald City Comic Con this year! There are two big differences between this and the previous designs I'd done. First was the sheer number of independent pieces of wax paper that had to be positioned relative to one another, thankfully I was able to position and then "fix" a few pieces at a time, and they were generally well behaved. Second was the amount of pre-processing that went in. Rather than starting with someone else's stencil, I started directly with the card art, first isolating the beastie from the background, and then adding breaks to highlight each plane of depth within the image, and eventually pushing it all to illustrator to generate paths. The laser cutter also had a bit more power than intended, so a few pieces that came out charred had to be re-made by hand with a hobby knife. That all said, I'm really happy with how this came out! Now that it's signed, I'm not sure I'm going to be wearing to on the regular, but might try to frame it somehow.
Ironed and braced for the bleach!Final shirt, signed!
A quick update; I cracked out another bleached shirt, this one based on the moogle-in-magitek-armor image by DeviantArt user Camac, straight out of FF6 for the SNES. It took some tweaking to make the pattern contiguous for the laser cutter, but not too much. A quick observation: the brand of the shirt seems to have a big impact on the minimum realizable feature size. We couldn't find the soft fancy v-necks we'd been buying, so settled on a four-pack of Haynes crew-neck shirts. They're comfy enough, but noticeably thinner and bleached substantially faster (think 10-20 seconds rather than 2-4 minutes to transition from black to maroon-pink). I stuck with the same freezer-paper and ironing method I've described previously.
Ironed patternFinal result!
For future patterns on these shirts I'll probably aim for thicker features and a finer spray at a larger distance, as I'm not totally happy with the the blurring on this one. Still, more SNES nostalgia is always good.


