Despite best intentions, I effectively stopped updating this site for the entirety of 2022. I've got a pile of projects and personal updates to share; let's take a look month by month.
January: Mostly goal setting, one of the big ones for this year was to cycle at least 1,000 miles before the year was up, which I actually managed to polish off in October! A marked improvement from the previous year, but still leaves plenty of room for improvement in 2023.

February: I spent some time re-playing Morrowind, my favorite of the Elder Scrolls games, but this time with the Morrowind Overall Improvement Suite Enhanced (MOISE) through Wabbajack. It was my first time using Wabbajack and I was surprised at how easy it made deploying the wild number of mods in the package. Have to say, it still holds up all these years later. This month I also polished off Pokemon Brilliant Diamond, which I didn't find as compelling as Platinum, but fun enough, and Kentucky Route Zero, which my friends had been pushing to the top of my queue for months. KRZ was amazing, and quite unique.
March: A significant amount of time in March went into organizing my unwieldy Magic collection. I threw together two shelves sized to wedge perfectly into my office closet, sorted everything, and printed labels for long boxes. Now that I'm writing this, I'm actually thinking to have another go with an eye toward spring cleaning, since I've absolutely accumulated more copies / variants of cards than I'm ever realistically going to use. I sped through Pokemon Legends: Arceus in March, which I thoroughly enjoyed. It was the first really fresh take on the formula in ages, and I absolutely devoured it.
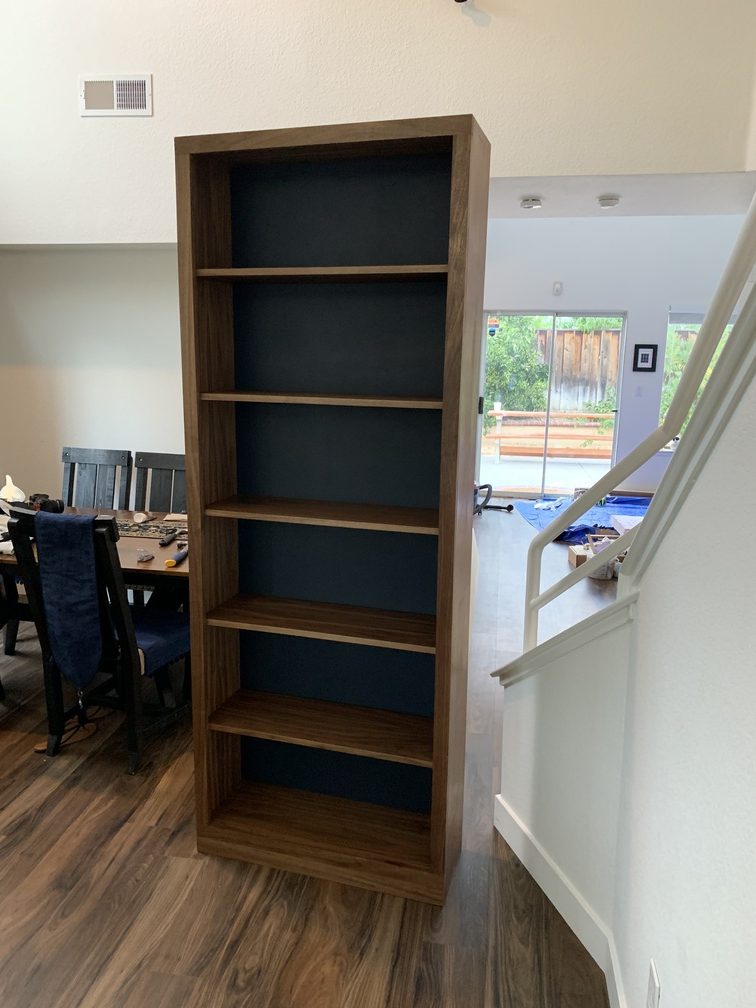
April: A big month work-wise, so not a ton happened home-side. This was the month were the rough sketch for our library finally became a CAD model. It was also when I first began really digging into Elden Ring, a game which eventually became my big obsession for the year.

May: A busy month! A playlist was sent out for my long-running disk exchange, I found a much safer bike route to work that I began using regularly, and we finally began cutting wood for the library. There were a few false starts and errors to sort out (always be clear if you’re measuring shelves center-to-center or inner-face to inner-face, material sold as 3/4” thick can be off by 1/16” and no one will tell you, etc), but real progress was made. Our group of magic-playing friends finally met up again, and I built new EDH decks for Ouliana and myself for the occasion (Jolene treasures and Kotori vehicles) which worked well. In less fun news, the water heater that came with the house finally gave out, after a bit of research we replaced it was a heat-exchanger based electric heater, which has performed beautifully and keeps the garage cool and dry as a bonus.


June: Rather than risk the expensive walnut plywood, we built the same design in bargain priced maple plywood; this first prototype bookshelf was glued up and put in my office! The other notable project in June was finally putting up mirrors in the garage gym, which required us to learn how to cut thicker glass. The methods for handling stained glass still work in principal, but we had to upgrade to some beefier “grozing” pliers to get consistent breaks.


July: I made a trip out to Arizona to see family, which was a fun time. We hosted one of Ouliana’s friends for bit, and began lacquering the bookshelves. The details of HVLP spraying were a little intimidating at first, but once we’d getting the mix ratio correct (and remembered to clean the spray gun!) it was an absurdly easy way to apply multiple coats of lacquer to large projects. This was the month were most of the library got built.

August: A month of travel! I joined Ouliana on a road trip that took us to Portland, Seattle, and Vancouver, and attended Siggraph for the first time, which was an absolute blast. It'd been years since I'd gotten to travel with my sister, which was a real treat. We even managed to hop over to Victoria for a day via seaplane, which was fun!

September: Another busy month at work, not a ton of projects got attention. I did start experimenting a bit with fasting, with some success with 8-36 hour long fasts. Success meaning I felt good, wasn’t hungry the entire time, and could easily focus on tasks. Going forward I’ll likely only fast for 8 hours or so a day, since the pattern of biking in, working, and biking home before breaking my fast felt quite good, and still gave me the energy and protein intake to support lifting. This was also the month I started a rune level 1 run of Elden Ring, and started recording videos of the notable fights. This run would continue through the end of the year, and still has two fights left to close out. This was both an excuse to practice my video editing skills, engage more deeply with a game I really enjoyed, but also to take part in the /r/OneBros subreddit of challenge runners, which has generally proved to be a bit more friendly and open than the /r/EldenRing community.

October: Another year, another Spooky Movie Month! This year we fell off the wagon a bit, and only a handful of the selections actually got watched, but it remains a fun tradition I’ll no doubt return to. In October we also made a trip out to Las Vegas for Magic’s 30th anniversary event! After playing the game on and off since 1995, I finally obtained a piece of power, a NM Unlimited Mox Jet. Not a major life event for most, but still a big day for me. I also picked up the last few cards for another deck (Nebuchadnezzar old cards) While in Vegas we also visited OmegaMart, which was amazing, and caught Tom Segura live, which was a treat. We got back just before Halloween hit, and went big on our halloween decorations, including the now-infamous 12 foot skeleton.


November: Given holiday travel, this was the month a lot of the end-of-year work had to be done, plus all the planning for the trip in December. The one project I did find time for this month was attempting to improve the fog machine we used at Halloween. The fog everyone wants is a spooky layer, hovering about ankle-high, obscuring the ground. Unfortunately, the fog most machines produce is hot and light, and mostly floats away in large clouds. We did grab something advertising itself as a low-lying fog machine that passes the hot fog through a chamber you load with ice, but it was hardly any better. Searching around surfaced this video demonstrating an ice-less solution. The guy postulates that it’s not the temperature of the fog that dominates it’s behavior, but it’s water content, which tracks since loading with water will change the density a lot more than a few degrees of temperature change. I went ahead and hunted down the parts, between Amazon for the transducers, and Lowes for the containers and couplers, and built a significantly improved fog generator! The other notable event was the acquisition of a wood lathe through The Crucible's annual garage sale! We haven't turned anything yet, but absolutely will soon.

December: With travel fast approaching, I had to batch out a lot of Christmas gifts in just a few days, so I defaulted to the things I know people will enjoy: jerky, cookies, and books. Unfortunately the dehydrator I’ve been using for close to a decade now finally gave up the magic smoke, and had to be replaced. The BeefBot 9000 (not it’s actual name, but rather a bestowed title) proved itself by working through 6 lbs of marinated meat in just two long sessions. After a frantic weekend of baking, dehydrating, and packing boxes, I got all the Christmas treats sent off before my flight. In January I should have an update to share, at present I’m in France, making use of my very-limited French and taking in the sights.


