Despite best intentions, I effectively stopped updating this site for the entirety of 2022. I've got a pile of projects and personal updates to share; let's take a look month by month.
January: Mostly goal setting, one of the big ones for this year was to cycle at least 1,000 miles before the year was up, which I actually managed to polish off in October! A marked improvement from the previous year, but still leaves plenty of room for improvement in 2023.
Getting started on my cycling goal
February: I spent some time re-playing Morrowind, my favorite of the Elder Scrolls games, but this time with the Morrowind Overall Improvement Suite Enhanced (MOISE) through Wabbajack. It was my first time using Wabbajack and I was surprised at how easy it made deploying the wild number of mods in the package. Have to say, it still holds up all these years later. This month I also polished off Pokemon Brilliant Diamond, which I didn't find as compelling as Platinum, but fun enough, and Kentucky Route Zero, which my friends had been pushing to the top of my queue for months. KRZ was amazing, and quite unique.
March: A significant amount of time in March went into organizing my unwieldy Magic collection. I threw together two shelves sized to wedge perfectly into my office closet, sorted everything, and printed labels for long boxes. Now that I'm writing this, I'm actually thinking to have another go with an eye toward spring cleaning, since I've absolutely accumulated more copies / variants of cards than I'm ever realistically going to use. I sped through Pokemon Legends: Arceus in March, which I thoroughly enjoyed. It was the first really fresh take on the formula in ages, and I absolutely devoured it.
April: A big month work-wise, so not a ton happened home-side. This was the month were the rough sketch for our library finally became a CAD model. It was also when I first began really digging into Elden Ring, a game which eventually became my big obsession for the year.
The pile of fancy plywood that inhabited the living room for most of the year
May: A busy month! A playlist was sent out for my long-running disk exchange, I found a much safer bike route to work that I began using regularly, and we finally began cutting wood for the library. There were a few false starts and errors to sort out (always be clear if you’re measuring shelves center-to-center or inner-face to inner-face, material sold as 3/4” thick can be off by 1/16” and no one will tell you, etc), but real progress was made. Our group of magic-playing friends finally met up again, and I built new EDH decks for Ouliana and myself for the occasion (Jolene treasures and Kotori vehicles) which worked well. In less fun news, the water heater that came with the house finally gave out, after a bit of research we replaced it was a heat-exchanger based electric heater, which has performed beautifully and keeps the garage cool and dry as a bonus.
The new water heater arrives!Prototype shelf gets glued up
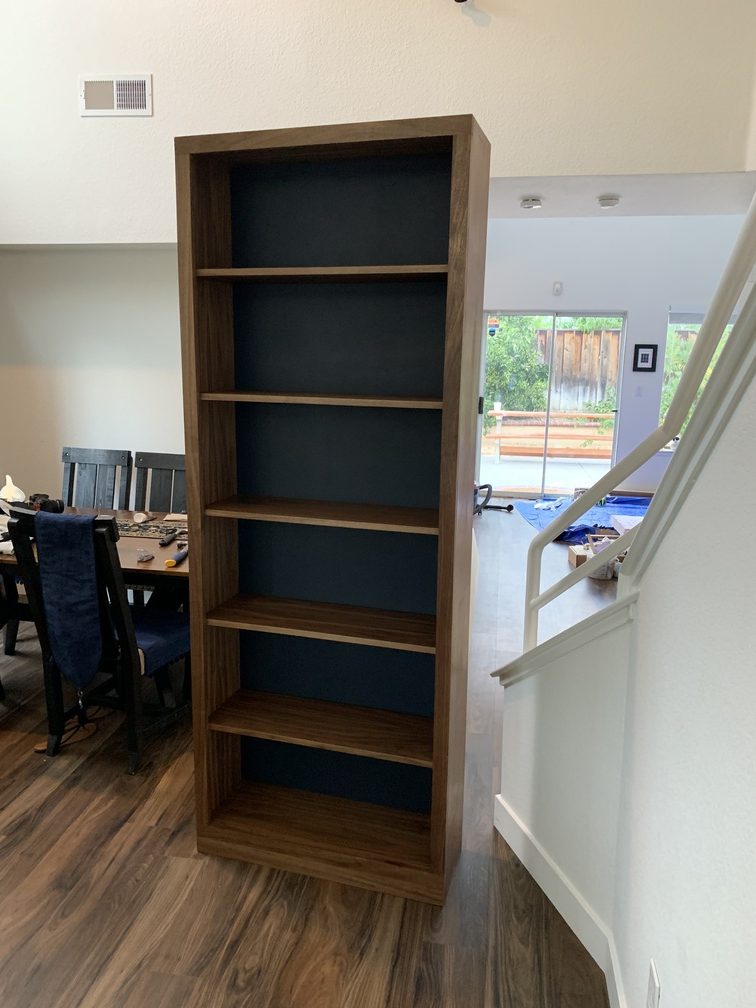
June: Rather than risk the expensive walnut plywood, we built the same design in bargain priced maple plywood; this first prototype bookshelf was glued up and put in my office! The other notable project in June was finally putting up mirrors in the garage gym, which required us to learn how to cut thicker glass. The methods for handling stained glass still work in principal, but we had to upgrade to some beefier “grozing” pliers to get consistent breaks.
First shelf finished!Fancy mirrors cut and installed
July: I made a trip out to Arizona to see family, which was a fun time. We hosted one of Ouliana’s friends for bit, and began lacquering the bookshelves. The details of HVLP spraying were a little intimidating at first, but once we’d getting the mix ratio correct (and remembered to clean the spray gun!) it was an absurdly easy way to apply multiple coats of lacquer to large projects. This was the month were most of the library got built.
After a few design tweaks, the first walnut shelf is completeLIbrary Layout in CAD
August: A month of travel! I joined Ouliana on a road trip that took us to Portland, Seattle, and Vancouver, and attended Siggraph for the first time, which was an absolute blast. It'd been years since I'd gotten to travel with my sister, which was a real treat. We even managed to hop over to Victoria for a day via seaplane, which was fun!
While it's basically a fancy ferry, the novelty can't be denied
September: Another busy month at work, not a ton of projects got attention. I did start experimenting a bit with fasting, with some success with 8-36 hour long fasts. Success meaning I felt good, wasn’t hungry the entire time, and could easily focus on tasks. Going forward I’ll likely only fast for 8 hours or so a day, since the pattern of biking in, working, and biking home before breaking my fast felt quite good, and still gave me the energy and protein intake to support lifting. This was also the month I started a rune level 1 run of Elden Ring, and started recording videos of the notable fights. This run would continue through the end of the year, and still has two fights left to close out. This was both an excuse to practice my video editing skills, engage more deeply with a game I really enjoyed, but also to take part in the /r/OneBros subreddit of challenge runners, which has generally proved to be a bit more friendly and open than the /r/EldenRing community.
First three shelves down, randomly populated with books
October: Another year, another Spooky Movie Month! This year we fell off the wagon a bit, and only a handful of the selections actually got watched, but it remains a fun tradition I’ll no doubt return to. In October we also made a trip out to Las Vegas for Magic’s 30th anniversary event! After playing the game on and off since 1995, I finally obtained a piece of power, a NM Unlimited Mox Jet. Not a major life event for most, but still a big day for me. I also picked up the last few cards for another deck (Nebuchadnezzar old cards) While in Vegas we also visited OmegaMart, which was amazing, and caught Tom Segura live, which was a treat. We got back just before Halloween hit, and went big on our halloween decorations, including the now-infamous 12 foot skeleton.
I got to meet Mark Rosewater at Magic 30th!My first piece of power!Our 2022 Halloween display
November: Given holiday travel, this was the month a lot of the end-of-year work had to be done, plus all the planning for the trip in December. The one project I did find time for this month was attempting to improve the fog machine we used at Halloween. The fog everyone wants is a spooky layer, hovering about ankle-high, obscuring the ground. Unfortunately, the fog most machines produce is hot and light, and mostly floats away in large clouds. We did grab something advertising itself as a low-lying fog machine that passes the hot fog through a chamber you load with ice, but it was hardly any better. Searching around surfaced this video demonstrating an ice-less solution. The guy postulates that it’s not the temperature of the fog that dominates it’s behavior, but it’s water content, which tracks since loading with water will change the density a lot more than a few degrees of temperature change. I went ahead and hunted down the parts, between Amazon for the transducers, and Lowes for the containers and couplers, and built a significantly improved fog generator! The other notable event was the acquisition of a wood lathe through The Crucible's annual garage sale! We haven't turned anything yet, but absolutely will soon.
New lathe!
December: With travel fast approaching, I had to batch out a lot of Christmas gifts in just a few days, so I defaulted to the things I know people will enjoy: jerky, cookies, and books. Unfortunately the dehydrator I’ve been using for close to a decade now finally gave up the magic smoke, and had to be replaced. The BeefBot 9000 (not it’s actual name, but rather a bestowed title) proved itself by working through 6 lbs of marinated meat in just two long sessions. After a frantic weekend of baking, dehydrating, and packing boxes, I got all the Christmas treats sent off before my flight. In January I should have an update to share, at present I’m in France, making use of my very-limited French and taking in the sights.
I've spent plenty of time digging into RNG manipulation in the previous Pokemon games, but the more recent Switch titles had been fairly well secured with CryptoSecure, which made predicting the outputs of the random number generation impossible in all but a few select cases. Strangely, the newer titles, Brilliant Diamond and Shining Pearl, abandoned CryptoSecure, but until just recently there hadn't been a clean way to discover the RNG seed without running custom firmware (CFW) on your Switch, which, among other hassles, makes online play risky, as modified Switches have been irreversibly banned from online play before.
Just a few days ago, on the /r/Pokemon_rng/ subreddit, I saw someone post that they'd successfully generated a shiny starter without needing CFW. I followed the references and came across a YouTube video by Papa Jefe outlining the process. The general gist was - blinking characters, both Pokemon and NPCs, insert intervals between blinks, the lengths of which are determined by RNG. Observe enough blinks, and one can determine both the RNG seed, as well as the current RNG frame. The cleanest and easiest way to do this would be with a HDMI capture card, but as luck would have it, I only had a Switch Lite handy, which cannot output video. I did however have a webcam handy, which can work almost as well!
I had honestly planned to write out all the steps in excruciating detail, but honestly the follow-up video Papa Jefe posted covers everything from the initial install forward. Instead I'll briefly describe a couple of the snags I hit along the way with my setup.
Issue 1: Window capture is Windows only, and even then wouldn't work on certain windows. I ended up getting around this by using an old USB webcam (Logitech B910HD) and pointing the script directly at it.
Issue 2: The "eye" it's looking for is based on the un-scaled video feed, if you screenshot the eye with a scaled video feed, you need to un-scale it using the inverse ratio (e.g. 75 in the Display Percent box, scale your captured image by 1.33x).
Issue 3: Every time my webcam is initialized, it tries to autofocus, leading to a ton of false blinks getting detected. This was solved by hunting down the old Logitech Webcam Software, entering "Quick Capture", popping out the Controls, the Webcam Options, and finally disabling Auto-focus. I found the eye detection worked best when I manually placed the focus one step away from sharp focus, so the pixel grid wasn't being resolved.
I got it into my head a little while back, the idea perhaps planted by a book-and-spreadsheet loving friend, that I should consider cataloguing our entire library. In part this was to provide friends with a handy reference of which books to avoid gifting us, since that’s an always popular option around the holidays, but also to provide a place to store notes. It would be interesting to have jotted down when we read a particular book, what we thought of it at the time, and maybe the recommender who convinced us to give it a read.
Just one corner of the stacks
It would’ve been easy enough, if incredibly tedious, to simply type in the details of every book into a spreadsheet and call it done. At this point I’m entirely convinced my efforts to automate the process have taken longer than simply typing them in would have, but I rationalize that adding new books will be easier, and the process of learning some new tools and writing a bit of code was far more enjoyable than filling my evenings with mindless typing.
The framework that first came to mind was simple enough; snap photos of every book’s barcode, use those barcodes to find the ISBN, use the ISBN to grab the meta-data, and populate a row of the spreadsheet with those strings. I would learn a few things along the way that complicated that flow, but the general skeleton of it survived the process intact.
The first step was to find a way to isolate the barcode from a photo and decode it into a string, this was luckily already an existing function in pyzbar. Next was to use this to find an ISBN - this turned out to be unnecessary (usually) since most books use the ISBN as the product identifier right in the barcode, the stored string literally is the ISBN. I'll get into the caveats to this later. Lastly was to use the ISBN to grab the meta-data, which conveniently is available through isbnlib, another freely available python library. If all of those steps succeed, then all that's left to do is write a row to a CSV file. I did play around with a few database options and fancy libraries, but ended up settling on using the barebones Python open() and write() functions for plaintext. The plan was to generate CSV files that could be imported into any spreadsheet software easily, I'm unlikely to own a million books, so no need to complicate this step further.
The core of the program was basically done, it worked on the twenty or so books I considered a representative sample (foreshadowing: it was not representative), so I powered ahead on building a GUI interface. Even with that small subset it was obvious I would want to be able to tweak the details before inserting each record into the file. Many times the data returned by isbnlib.meta() was incomplete, and there were several sources that function can be set to choose from - manual review wasn't avoidable, still easier than typing literally every bit by hand though.
Honestly, I'd never bothered with complicated GUIs in Python before, and certainly not since Python 3 became the default. After reviewing the libraries, and there are so many, I settled on wxPython and hunted down some basic tutorial videos. It took a while, but eventually I had a tenuous handle on frames, panels, sizers and the like. I'm sure any deft wxPython use would find my code miserable, but it does run, and with a little window re-sizing, worked for all the images I fed it.
At this point I had to decide what the workflow of this program was going to look like; I settled on the following: the user will specify an output CSV file for the results, then point the program at a directory containing jpeg files, then the program will populate a selectable list with those file names. The user then can click on each file name, causing the program to display the image and populate the ISBN field automatically. A button then triggers the meta-data look-up, which populates the remaining fields. After review, they can click to write the row to file and remove the selected file from the list, also moving the image file to a /Success/ directory, repeat until the list is empty and all your books are in the CSV. I also added an option to skip a photo, moving it to a /Skip/ directory without writing any record, so unparsable images wouldn't continually end up at the top of the queue. Generally speaking, that worked great.
Program in action
Now for the snags. Firstly, there's a field in that screenshot that isbnlib.meta() does not provide: the subject tags. Interestingly enough, it's not trivial to discover if a given ISBN is a mystery novel, a comic book, or even simply fiction or nonfiction. There are paid services that will return detailed tags (ISBNdb seemed to be roughly what I was after), but aside from that, I was left searching. Eventually I found that OpenLibrary has user-curated tags associated with each of their entries, but isbnlib.meta() doesn't retrieve them, so I wrote my own handler (just grabbing the url to text, parsing it as JSON, and joining the bits grouped under 'subjects').
This worked, but "user curated" inevitably means practically random. Some books would have no subjects tagged at all, others would have pages of tags, some tagged in other languages, some tags were control codes for someone else's scheme. It was, and remains, the wonkiest part of my flow. In practice I manually reviewed and cleaned up these tags before inserting each record, and even build a set of buttons to add the most common tags quickly. I have some thoughts to do a housekeeping down the line where I look at the frequency of each given tag and cull the nonsensical ones that snuck past me, but that's a task for some other weekend.
Most of the other stumbling blocks I hit had to do first with older books, back from before the ISBN standard was created in 1969, though in reality there were plenty of books lacking an ISBN through the 1980s. Thankfully the switch from ISBN-10 to ISBN-13 that happened in 2007 is essentially transparent to my program's workflow, either work fine. The second issue was non-English books catalogued in pre-ISBN systems, or simply not catalogued at all. In both cases, these had to be entered manually, usually requiring a minute or two to search up the details of publishing date, edition, etc.
Aside from those cases, a lot of failure states had to be accounted for in the flow. Was the photo subpar and a barcode couldn't be found? Was the ISBN entered invalid? Did the meta() function fail to return anything at all? I eventually added a status bar to the program to provide these sorts of messages in a less obtrusive way - even just using it myself I found pop-ups insufferable.
Records in the spreadsheet
While there is still some clean up to be done, adding new books is a breeze and I can maintain a live inventory on Google Sheets pretty painlessly. It also doesn't hurt to keep track of who got lent which book when, or who lent me a book that I've failed to read for ages!
As for the code; I'm not sure the cleanest way to share it, I've never really messed with GitHub before, but it seems cleaner than simply tossing a IPython notebook file up without any other info. Behold, my first git repository.
The next big project in the queue is building a set of custom bookshelves to house these ~1,500 books, which will be laborious in an entirely different and interesting way!
I'm not sure what pushed me over the edge from being generally interested in retro gaming to actively picking up consoles and games (I suspect binging videos from The Retro Future, TysyTube, and Restoration EG), but over the last month or two I've gotten into both collecting and restoring the game consoles and games of my youth. It started with a friend asking if I was interested in buying an original Gameboy (DMG-01) that wouldn't always power on, and it was incredibly fun to take apart, diagnose (dust and gunk in the power switch, corrosion on the battery contacts), fix the issues, clean up, and yes even play. The only replacement part it needed was a new glass screen lens I picked up for all of $5, and now it looks as good as it did in 1989.
Last month I picked up a Super Nintendo console at a local game shop, everything was working, but the shell itself was pretty grimy and yellowed. I decided to give it a thorough cleaning and inspection, as well as take a stab at retrobriting the case. The cleaning wasn't too difficult, there are plenty of guides on disassembling the console, and only one specialty bit is needed for the case screws (a Nintendo gamebit). Hot soapy water, a soft bristle brush, and a micro abrasive magic sponge did an amazing job de-griming everything, even removing the name written on the bottom in sharpie (which really takes me back to the 90s.)
SNES as purchased
Because I can't resist making a project out of everything, I decided to build a dedicated box lined with UV LEDs for the purpose. It doesn't hurt that it could double as a UV resin hardening chamber, or perhaps for UV bleaching other things. I'd seen several iterations of the idea on YouTube, and borrowed a few elements that I liked from each. I ended up grabbing two storage bins from Target, one an opaque 31 gallon bin to use as the outer shell and a transparent 32 quart bin for the interior. For the UV light I picked up 40 meters of UV LED strip, which included an AC adapter and splitter, I just needed some paired wire to jump between the segments. I wanted to use as much of the LED strip as I could while also getting even illumination; I ended up cutting the strip into 6 segment strips for the sides, placing 6 of those strips across the short ends and 9 across the long end. The lid was slightly longer, so it got 6 strips of 8 segments. Before placing the LEDs I lined the interior of the larger bin with strips of aluminum tape I had left over from the kegerator build in order to keep the UV light contained and limiting the absorption into the walls. In order to prevent shorts under the LED strip, and because the adhesive it's backed with isn't amazing, I put stripes of double-sided tape under each strip. A small drilled hole near the base served as the entry point for the cable.
The last question before putting it into use was what recipe to use. A lot of the early discussions of retrobrite focused on the role of laundry soap (TEAD) as a necessary component, but after my previous session digging into the details, it seemed entirely unnecessary. A lot of people seemed to be using 12% hydrogen peroxide on YouTube, but some were using 6% or even 3% with reasonable results, the big difference being how long they allowed the process to run. I'd be remiss to not mention the excellent experimental video from The 8-Bit Guy where he compares multiple very different protocols on keys from the same yellowed Amiga keyboard; while there are some tweak I would've made to the experiment (namely controlling the UV dose more carefully), it made a convincing case for a liquid hydrogen peroxide bath catalyzed with UV or heat.
I decided for my initial run to split the difference; I mixed a 50/50 mixture of 12% hydrogen peroxide and tap water, yielding a 6% solution. I needed one gallon to fully submerge the the top half of the SNES shell, so half gallon of each was added to the smaller tub. In order to prevent the parts from floating to the top as bubbles accumulate, I filled small glasses with tap water and rested them on top, since both should be relatively transparent at this wavelength.
SNES disassembledInto the box it goes
Based on the other protocols I've seen, I decided to aim for 24 hours, taking a peek every 6-8 hours to check progress, knock off bubbles, and make sure the parts remained submerged. The improvement looked modest when I looked down into the box, but when I'd rinsed off the solution and compared the top of the shell to the untreated bottom half, it was incredibly apparent.
Before (bottom) and after (top)
Seeing the results on the top, I decided to go ahead and run the bottom half and controller shell as well. The question I had was; how much had the first 24 hours diluted the solution? I know hydrogen peroxide breaks down into water and oxygen under bright light, hence the reason it's always sold in opaque containers, but would it still be effective? I don't have a spectrometer at home (yet!), which would've made it easy to measure the residual concentration, so I decided to simply drop the remaining bits into the same bath and observe the process after 6, 12, and 24 hours. After 24 hours the bottom half visually matched the top half; the efficacy of the bath seemed essentially unchanged between the two cycles. I suspect rate of breakdown is far lower than I imagined; when I dumped the solution into the yard it fizzed a great deal, still plenty of active H2O2 left over.
Both sides done
Reassembly took a couple minutes, but no major snags were hit. I did notice a bit of corrosion at the bottom of the cartridge slot, so took a moment to scrub it down with isopropyl alcohol to clean it up.
Clean and reassembled
All done it took just two days and a half gallon of 12% H2O2. With that done, it's back on the shelf ready to be fired up! The whole process of getting video output from an SNES to a modern flatscreen television isn't as straightforward as I'd hoped, and while I've got a reasonable image now, I'm thinking to do a comparison once a couple of cables arrive later. Until then I can enjoy reliving some of my early gaming memories any old evening.
It's been a few months since I posted any updates here, it's been a busy year and it's been tough to find time to sit down and write them out. What all has happened since the last post in March? We bought a house, which is still hard to believe! A lot of projects of the sort I'd usually share here have also come together; we built a proper work bench for the woodshop that now resides in the garage, put together a french cleat wall for tool storage and organization, and even got the first home-brew of the house complete (a pear cider.) I also got super into biking, which has only been recently curtailed by the poor air quality that comes with the annual fire season. A lot of my non-work brain space has also been taken up by renovations; the kitchen has been entirely re-done, and was completed just a few days ago, which has unfortunately meant we went months without a proper kitchen to cook in. I'm planning to make a handful of posts over the next few days recapping the projects that came and went over the last year and a half, as well as the current personal project in my queue; semi-automated library cataloging in python.
Disclaimer: This is only concerning finding SID on a retail copy on original hardware. If you are using an emulator, or have a way to dump the save file, just load it up into PkHex instead.
I spent a little time during 2020 learning how to manipulate the RNG (random number generation) in Pokémon Platinum, a 4th generation game. The gist of it was that the game seeds it's random number generator using the system date and time, so if one used a good timer and started the game at the correct time, and triggered an event on the correct frame, any desired outcome could be attained. I used this to pick my trainer ID and secret ID (TID/SID) combination, and later to force various encounters to be shiny, eggs to have better IVs, wild pokérus to appear, etc. Recently I picked up a genuine copy of Emerald, which was harder to find and a bit more expensive than I thought it would be.
Wanting to do many of the same things I accomplished in Platinum, I looked around for a way to set my trainer and secret IDs while starting a new file. Unfortunately, the RNG in Emerald in particular (not sapphire or ruby) is "broken", it doesn't take into account the system time / date when seeding the generator, it just always starts with a seed of 0x00. This makes it impossible to arbitrarily choose your trainer ID/secret ID, so the long-standing method of determining SID on Emerald involved finding a naturally occurring shiny pokemon and working backwards from it's IVs, nature, gender, etc to determine the SID for which it is shiny.
However, a YouTuber by the name of Choppy came up with a method for determining the SID without the onerous full-odds shiny hunting step. The video is here, I'm only writing this up because I haven't actually seen another written guide, and videos do seem to periodically evaporate off of YouTube. I've included screenshots from Choppy's video (as I don't have an emulator set up) and from the tools used on my laptop. I should say first, this only works for fresh files, this method wouldn't work for an existing file. With that said, let's dive in:
Step 1: Obtain the Tools
In order to do this you'll need a couple of Windows programs. I believe there are Mac versions out there somewhere, I'm just not familiar with them. It's likely both of these could be run through Parallels or similar.
Get all the way up to the point where you've typed out your name, move the cursor to "OK", and wait there. The time between when that is pressed and when file completion is complete is something we need to control carefully. Open EonTimer and choose a value for Target frame, this corresponds to how long you'll have to mash through the rest of the file creation; I chose 1550 to give me some breathing room, Choppy used 950 which is about as short as one can reasonably go. For the purposes of this write-up, I'll assume you used 1550 like I did. I'd also recommend opening the EonTimer configuration and making sure it's set to "A/V" mode, which will provide six beeps and flashes of color as the timer nears zero.
When you're ready, hit start on EonTimer which will kick off a 5 second pre-timer. As soon as you hear the 6th beep, press A on Emerald. Now continue through the rest of the file creation until you reach the screen where Birch says "Come see me in my POKEMON LAB." and wait for the timer to again reach zero. When it does, hit A. This will finalize the character creation and set your TID/SID.
Step 3: Finding TID in Hexidecimal, Finding Candidate SIDs
Once the moving truck comes to a stop, open your trainer card in the start menu and find your trainer ID number. We need to know this value in hexidecimal (base-16) for this step, so either fire up window's calculator in programmer mode, or drop your trainer ID into a converter like this one.
Start up RNG Reporter and open the Researcher menu. There are only a few things we actually need to change here: in the Max Results box put in the target frame from EonTimer plus 100 (so I put in 1650), in the seed box put your trainer ID converted to hexidecimal, change the first drop-down menu on the right to "16bit High" and put "1" in the box to it's right. With that done click on "generate", right click anywhere in the table below and export the results to a TXT file.
To explain a bit; the TID is set 50 frames after you pressed A at the final Birch text screen; since I was aiming for 1550 mine was likely created within a couple frames of 1600. So the next step is to open the text file we just exported and trim it down to the entries very close to 1600. I chose to look at 5 frames before and 5 frames after, about 0.2 seconds at the 60 fps the game runs at. The key numbers here are in the 5th column, they should be 4-5 digit long decimal values, those are our candidate SIDs.
Step 3: Which SID did we hit?
This is the most time consuming step. What we need to do is attempt to RNG our starter to be shiny for each potential SID, when we succeed we'll know we've got the correct one. First go through the steps needed to get to starter selection in Emerald; set the clock, meet Brendan, and finally save right in front of Birch's bag.
Pick one of the SID candidates, you probably landed quite close to the center of the range, so starting with frame 1600 is fine. Head to the main screen in RNG reporter and make sure it's set to "Method 1". Drop in your trainer ID for ID, and the candidate for SID. We're looking for a shiny, so go ahead and check the "Shiny Only" box. We can leave seed at 0, since that's the uniquely broken part about Emerald. Hit generate, and it should hopefully show the first shiny frame at a reasonable wait time. If it's excessively long, you can always test other SIDs first, as each will have a different wait time before the first shiny frame.
Take that frame number and drop it into EonTimer's Target Frame box. With the game running normally, standing in front of Birch's bag, hit start on EonTimer. When the pre-timer hits zero, do a soft reset (A+B+start+select). Re-enter the game as quickly as possible and hover your cursor over the "Yes" selection on your starter of choice.
When the timer hits zero, slam A and the battle with zigzagoon will start. Head to the Pokemon menu and view the summary for your starter. Odds are likely it doesn't match the frame from EonTimer, so the goal now is to figure out which frame you did hit.
Go to RNG Reporter and uncheck the "shiny only" box, set the starting frame to your target minus 50, and Max Results to 200. This should show all the starters you might've hit (you may need to expand the range a bit the very first time). To narrow down which one we did hit, first use the Natures drop down to show only frames for the nature your starter got, and the gender dropdown (all starters are 87.5% male, 12.5% female) to mark which one you got, and finally open the IV checker and drop in the stats from the summary page. You can use the filters on the main screen to further narrow down the results, but with all the stats and gender accounted for there should be only a couple frames that could have generated your exact starer. A second final check is looking at the "50%F gender" on the frame 142 past your starter, as this should correspond to the gender of the Zigzagoon you end up fighting.
With all that you should have determined which frame you really did hit. If there are a handful of possibilities then pick the one closest to your target - it's much more likely you missed by 1/60th of a second than 1/2 second. Go back to EonTimer and drop that frame into the "Frame Hit" box and click Update. This will apply a correction to the timer. Repeat that same process, getting closer to your target frame each time. Generally speaking, once you're quite close, just using the nature of your starter should be enough to narrow it down, as those don't recur too frequently. Once you're landing on frames within +-3 of the target, it generally doesn't help to keep changing the calibration, it's more luck at the point. When you do hit your frame, that is the nature, gender, IVs, and zigzagoon gender all match, you'll either have a shiny, or know the SID candidate you're testing isn't the right one. At that point, delete it from your text document and try the next one.
The process is a little labor intensive, hitting a frame isn't always easy, but the calibration you dialed in testing the first SID should remain valid for the rest of them. Out of the list of 11 I generated, the 2nd one I tested (target frame minus 1) turned out to be correct, so my shiny mudkip appeared. With my SID in-hand I was able to start my play through knowing I'd be able to RNG shininess once I was far enough into the game. I recognize I was pretty lucky. Still, it's worlds easier than hunting a full-odds shiny, and it's significantly more deterministic which makes the effort more palatable.
Note: It's been a good 6 months since I've posted an update, an inexcusably long time it seems. I'll be writing up and sharing some of the things that've crossed my brain-space in that time in the next few weeks, more big news to come.
Warning: Hydrogen peroxide in even modest concentrations is corrosive, be absolutely sure to wear gloves and goggles when handling it. It will rapidly bleach and deteriorate clothing and some metals. Never handle an industrial chemical you're not familiar with before reading though (and yes, I mean actually reading) the material safety data sheet, or MSDS.
Example of Retr0brite on an SNES console
I recently fell down a rabbit hole on YouTube, watching videos of people carefully restoring the vintage game consoles of my early years. Apparently an offshoot of the other tear I’d been on recently, digging into interesting glitches in older games; more on that in a later post. There’s something compelling about all restoration videos, from rusted barbell plates to yellowed-varnish on a painting, but that’s not what piqued my particular interest yesterday. In a lot of these game console restoration videos they mentioned retrobrite (stylized “retr0brite” with a zero in print), and at first I’d assumed it was just a commercial product, since the name honestly fit the bill. It was only when I came across a video with the process in action that I became confused.
Retr0brite isn’t a product, but rather a process. It boils down to a single step, submerging an aged plastic part (sans metal and rubber pieces) in a bath of roughly 10% hydrogen peroxide while flooding with ultraviolet light, typically sunlight or a UV LED strip. The catalyst I talk about later is entirely optional. In video after video I saw this process covert yellowed age-ridden plastic into what looked to be factory-fresh versions of the same parts. Usually I’d take this as a neat trick, but what I was seeing and the claims that accompanied it (namely that the process was "restoring" or "de-aging" the plastic) completely contradicted what I knew about plastics. To be fair, while I am trained as a materials scientist, polymers were never my specialty. One of the few practical facts I've retained about polymers is that they almost always become damaged and brittle under prolonged UV exposure. So the idea of reversing a degradation process by flooding them with UV, and soaking them in an oxidizing agent to boot, felt absolutely bonkers. I had to know more. Briefly, let me just drop here the exact protocol - it was originally suggested that it be mixed up in a paste, but it seems easier and more straightforward to deal liquids hydrogen peroxide, and the restoration community seems to have settled on that method as well.
The (Modern) Retr0brite Protocol
First thoroughly wash and scrub the yellowed plastic, be sure to remove any polishes or coatings that might block the UV illumination. Fill a container with hydrogen peroxide with a concentration of 10-15%, 12% is sold to consumers as a hair bleaching solution and should work well. For every 500ml of hydrogen peroxide add 0.5-1 teaspoon of “Oxy” laundry detergent (a consumer source for TEAD, our catalyst, more on that later). Wearing gloves, submerge the yellowed plastic parts completely. Expose the container to 1-2 hours of bright sun light or 12-48 hours of UV LED lightning, checking the color periodically. It’s a good idea to check the temperature of the bath periodically as temperatures above 60 C can lead to warping of the plastic parts. Remove them from the bath when they look like their old selves, and rinse thoroughly with water before re-assembling the device. The hydrogen peroxide will eventually be depleted as it breaks down into water, so replenish the bath as needed if you're re-using it.
Okay, so what is going on here?
Most of what I found while searching was simply people providing the recipe, attempting to sell some kit or product based on the process, or running a console restoration service. After a good long while I finally came across the original source: A series of write-ups by Dave Stevenson from Manchester, UK (aka Merlin on the AmiBay, English Amiga Board and Vintage Computer Forums), now only viewable through the Internet Archive. In these posts they shed some light on how the process was discovered by accident in a German museum for Commodore computers sometime in 2008, which seems fitting. Much of their explanation was repeated on Vintage Computers and Gaming shortly thereafter, as well as many many forum threads. In the years since then this explanation has made it to basically every corner of the internet that is interested in this sort of work, but it struck me after awhile that the mechanism they describe cannot be quite how the retr0brite protocol de-yellows plastic. Let's start at the beginning.
ABS Plastic
The plastic used to make computer cases and many of these retro electronics enclosures is called acrylonitrile butadiene styrene or ABS. ABS is actually a terpolymer and is made up of the following chemicals: acrylonitrile, 1,3-butadiene, and styrene. The acrylonitrile provides thermal and chemical strength, the butadiene provides flexibility and impact resistance, and the styrene provides the glossy surface as well as making the polymer inexpensive and moderately machinable. This mixture, when heated in the presence of catalysts produce the ABS polymer.
The monomers form a cross-link lattice, and it is this lattice that gives the plastic the required strength, as styrene is a brittle material; the styrene partly fills in the voids within this lattice work as well as cross-linking to the acrylonitrile. The butadiene has a similar effect, as well as dispersing in the molten polymers. ABS was one of the first commercial plastics and was developed in 1948, and remains one of the cheapest injection-moldable plastics.
Flame Retardant Theory
Untreated ABS plastic is combustable, which is a bad property for consumer electronics to have. Chemists found that the combustibility of ABS could be reduced by adding poly brominated diphenyl ethers (PBDEs), compounds containing a good amount of the Group VII halogen Bromine. Halogens had a long history of use in fire suppression before their negative environmental impacts were known; the bromine in ABS is contained within the polymer and presents no such hazard.
The primary PBDE used in consumer electronics plastics back in the 1980s and 90s was tetrabromobisphenol-A (or TBBP-A for short). The theory put forward back in 2008 held that these bromine atoms would eventually be implicated in the yellowing process.
The thinking was that incoming UV light would break these bromine free from the TBBP-A, and these free radicals would then stabilize by forming semi-stable coordinate covalent bonds with oxygen, causing yellowing in the surface when this occurred near the surface. The use of UV light in retr0brite was claimed to destabilize those coordinate bonds between bromine and oxygen, allowing a hydrogen from the hydrogen peroxide to instead bond with the bromine and reduce it to a colorless substance. The tetra-acetyl-ethylene-diamine (TAED) the protocol calls for serves as a catalyst in this process, reducing the energy needed.
Misgivings and Clarity
This explanation almost fit with the observations, but something still didn't sit quite right. My first thoughts were; I remember handling bromine, it evaporates quickly at normal temperatures and pressures, it is only darkly colored in it's covalent form (Br2) while bromates are usually colorless, also it is really quite pungent. If ABS plastic gave elemental bromine off in sunlight we'd almost certainly smell it. After a bit more searching I came across an excellent post by a chemistry student on Reddit by the name Grogglebob, that put a finger on the two major inconsistencies in this proposed reasoning. First, that one needs a cation counterpart to coincide with the bromide anion being created, and that there are dozens of industrial studies of ABS plastics yellowing even in the total absence of TBBP-A or other bromine-containing additives.
It seems more likely on inspection that the yellowing is due to photooxidation of the polymer itself, not the additives. In that post they cite a paper, Clarification and Discussion of Chemical Transformations Involved in Thermal and Photo-oxidative Degradation of ABS by J. B. Adeniyi (Eur. Polym. J. 1984, 20, 291-299), which lays out a reaction scheme showing how unadulterated ABS polymer will photo-oxidize to eventually produce a stable compound called α,β-unsaturated carbonyl. They suggest that since conjugation tends to reduce the energy gap of compounds, it's not unrealistic that this compound might have a yellow color.
The conjecture now is; the butadiene chain is full of double-bonds, these are the sites where this carbonyl forms, and they themselves contain a double bond. If the hydrogen peroxide is a strong enough oxidizer (or is so with the help of TEAD) to break these double bonds, then it's possible it's breaking the double bond on the carbonyl, effectively bleaching it.
It's just bleaching
The major difference between these two interpretations is that the first proposes that retr0brite is reversing the degradation and stabilizing the free radicals, while the second proposes that retr0brite is actually further degrading the material, but simply degrading the yellow-tinged chromophore first. Given that the solution itself, hydrogen peroxide plus a non-chlorine bleaching activator (the TEAD), and catalyzed by UV light, seems a lot more like a traditional bleaching solution than a hypothetical bromine soluablizing solution. If the goal really were to solubilize and remove bromine and borates, water would probably work, but it really seems like they're not the problem we're dealing with.
This interpretation is furthered by the demonstration another user on YouTube provided, using methanol, hydrochloric acid as a catalyst, and bubbled chlorine gas as their bleaching agent, and achieved similar results (though it did more aggressively attack the plastic) with this alternative bleaching solution. Our hydrogen peroxide, TEAD, and UV treatment is just a normal bleaching process, albeit one that is more gentle than chlorine based bleaches, and one that does seem to degrade the chromophores first.
Take aways
All that said, is there any reason not to use this process to de-yellow aging electronics? I honestly don't think so. Anecdotally at least, the change in mechanical properties appears to be quite small, and experiments attempting to demonstrate that re-yellowing occurs faster after treatment haven't been terribly consistent. It is possible that the mixture, in addition to breaking down the chromophores, also breaks down light-stabilizers intentionally added to the plastic, which could lead to a faster second yellowing, but users have reported good results with a thin coat of UV resistant varnish. It's true though that it's certainly not "de-aging" or "stabilizing" the plastic, and anyone claiming otherwise is talking nonsense. It won't be any less brittle after the treatment than before, but will be less yellow, which is probably more than enough.
Only after writing this all out did I finally stumble upon this excellent write-up by Josh Velson over at Quora, a chemical industry consultant, and this piece over at Medium by David Flood . Thankfully it seems I came to the same conclusion as people who are probably more suited to the question - namely that the originally proposed mechanism for the action of retr0brite is nonsense. Less fortunately, it seems that the bromine hypothesis has basically been taken as gospel by many users of the protocol in the electronics restoration hobby. That all said, I suppose it doesn't really matter - gently bleaching old plastic still makes it less yellow, regardless of how you think it gets it done.
This is the first in a series of write-ups I'm planning covering some of the esoteric aspects of these games that I've dived into over the last few months. Admittedly, this one doesn't showcase much on the technical side, but plenty more of that is to come.
For a touch of context: in the Pokémon series of games Game Freak has, since 1999, included individual pokémon with altered color pallets that show up at very low rates. Something akin to albinism we see in the real world. When they appeared on screen they would be accompanied by a "shooting star" sound and a swirl of stars, leading to the fan-provided moniker, "shiny pokémon." In fact, the rates are so low (running between 1/4,096 in the more recent releases and 1/8,192 in the games in which they first appeared) that, aside from a single-digit number of guaranteed or high-odds shiny encounters throughout the series, it's entirely possible for players to complete all the mainline games and simply never encounter a random one. This same mechanic appears in Pokémon GO, albeit at might higher rates (1/450 for most encounters, 1/19 for most raid bosses, and 1/25 for events), though for this post I'll be talking exclusively about the mainline games.
The "shiny-ness" has zero impact on the battling aspect of the game, and (since Generation 2 at least) is not tied directly to the particular stats of the pokémon. Instead it serves as a particularly rare trophy, a reason to include something on your team you'd usually pass over because your lucky number came up in a very once-in-a-blue-moon way. Naturally once something "hyper rare" exists within a game whose whole mantra revolves around collecting, the notion of attempting to collect shiny pokémon naturally arises.
I had done a little shiny hunting in the latest generation over the holidays, but once quarantine hit it crossed my mind to revisit Generation 7 as I had never completed the re-makes (Ultra Sun/Moon). After finishing out the storyline I decided to sink some of my now boundless home-bound time into something I'd somehow never managed to do since playing Pokémon Blue back in 1996: actually completing the pokédex. A reward for doing so is obtaining the shiny charm, an item that improves the odds of encountering shiny pokémon to 3/4096 (~1/1365); a way of breathing a last bit of life into a game the player has already spent an unusually large number of hours on.
The Generation 7's Ultra versions included a new mechanic for encountering legendary pokemon from previous generations, even from the original games released 19 years prior. These legendary pokemon, relevant to the lore of the game, usually featured on the box-art for each generation, with high stats and powerful moves, can also be shiny. So naturally, I decided to hunt down some shiny legends.
Through conversations with friends I became aware of the subreddit, /r/ShinyPokemon, and learned that soft-resetting (inputing a button combination that restarts the game software rather than closing it entirely) was a popular method, as it significantly reduces the time-per-attempt. That time is a key metric when rolling dice against such poor odds.
Several additional factors made this easier than I'd first suspected: these pokémon I'd be hunting were static encounters, so there was zero chance of finding something I wasn't after, I already had two 3DS consoles so I could effectively halve my search time, and a couple of strategically placed rubber bands meant it took only a single button-press to reset the game, meaning I could easily watch a show, listen to a podcast, or do whatever else while resetting.
Hunting on two 3DS-XL consoles
I've also come across numerous horror stories of people "failing" shiny encounters, usually by accidentally knocking it out with a critical hit or having the battle go on for so long that the target runs out of attacks and is forced to use struggle, knocking itself out with recoil damage. While I didn't mind the idea of resetting for a shiny once, failing the "easy part" felt untenable, so I decided to prepare as much as possible. In the end I trained a team specifically for undertaking these hunts.
The first priority was preventing the target from ever using struggle; namely by forcing it to hold a Leppa Berry, which restores 10PP to an attack when consumed, and skill swapping the ability Harvest onto the target, giving it a chance to regenerate a consumed berry every turn. Thankfully none of the legends I was planning to hunt had moves that caused recoil damage, so once this first step was done there was effectively no timer. Next step was to apply a series of debuffs to make sure their typically powerful attacks could disrupt the catching, and finally reducing them to 1hp and putting them to sleep.
Shiny hunting squad
All this ties into my second ambition: to get all these shiny legends into beast balls. Why beast balls? I love how they look, they get a special animation in newer games, and the 0.1x catch multiplier presents a big step up in difficulty. It took 65,991 resets, meaning an average of 1,466 per legend, slightly above odds, and about 5 months, but I’ve now caught every wormhole legendary and ultra beast as a shiny in a beast ball. I've thrown the images up in an Imgur gallery, and linked a simpler montage below.
EXPAND for Additional Detail on Method
The plan going into each encounter was almost identical. First Trevanent uses Skill Swap to give the target the ability Harvest, then Trick to hand off the Leppa Berry. At this point, the target can never run out of PP and use struggle, and since none of the wormhole legends or UBs use moves with recoil, the encounter is now effectively without a time limit. As an aside: It’s worth noting that Bestow, which Exeggutor has, will fail if the target is already holding an item, and Ho-oh notably always holds the Sacred Ash, so Trick is a generally safer option. Next I’d switch in to Umbreon, an incredibly tanky pokemon, and use debuffs until the target had -6 accuracy as well as -6 either attack or special attack. The encounters can run incredibly long using beast balls, so it’s critical that most of their attacks miss, and those that do hit like pillows. Finally I’d switch in to Breloom and false swipe them to 1 hp, apply spore, use a roto-catch power, throw beast balls until that magical click happens (1.26% chance without roto-catch, 2.5% chance with it). Since Breloom is healed by poison, and the toxic orb keeps them continually poisoned, no other status condition can be set on it.
The team has a couple extra members: Shiinotic serves as a self-healing debuffer and back-up Spore user, this can be useful when the target has attacks that apply a status condition and you can’t risk Umbreon’s Synchronize putting that condition on the target. Remember, sleep and frozen provide significantly higher catch rate bonuses than the others, and burn or poison can end the encounter! Bronzong can apply sleep to grass-type targets that Spore can’t hit (use an X-accuracy to make Hypnosis hit more often). Pangoro was used for Giratina and hunting the Harvest Phantump, as the Scrappy ability means it can connect with False Swipe against a ghost-type. Exeggutor, in addition to holding an extra Leppa berry just in case, also was critical specifically for hunting Lugia, who has Skill Swap as one of it’s moves in this generation. In order to keep Harvest on it, both active pokemon need to have Harvest. Once Trevanent gives Lugia harvest, keeping Eggexecutor in means it can’t end up with any other ability and eat it’s only Leppa Berry, prematurely ending the encounter.
I trained up the team to the mid-90s by chaining Chansey / Blissey using the bush on the Poni Meadow with the roto-XP power active. In the process I ended up with several shiny Chansey just because the chain got so long, and I ended up training two copies of the team so I could hunt on Ultra Sun and Ultra Moon simultaneously (having previously picked up USun for myself and Moon for my partner.) The only other prep was grinding absurd amounts of money by crushing the rocks on the Poni coast for star prices and related item, and buying similarly absurd numbers of beast balls from the Aether Foundation, as in the Ultra versions an employee there sells them for 1000 pokedollars each. Without that change these hunts would’ve been basically impossible, as some legends took upwards 500 beast balls to catch before I realized I should be using the roto-catch power, and still as many as 150-200 balls with it active.
Some statistics: The average number of encounters to find a shiny came out to 1,463, a shade above the rate one expects with the shiny charm active (1/1,365). The standard deviation was huge, 1,364. This reflects the fact that some of the hunts ended absurdly quickly (Terrakion, Xerneas, and Guzzlord at just 4, 10, and 13 resets) while others went well beyond odds (Kartana, Regirock, and Giratina, at 5,426, 4582, and 4,576 resets). Thankfully my single Gen 2 full-odds hunt, Celebi, came in vastly under odds at just 1,599 resets against a rate of 1/8,192.
Update: I've decided to add quests to this post as I type them up, rather than producing a string of posts that would inevitably get dis-associated with one another.
I was recently contacted by a player of the MUD from years back, asking if I still had notes concerning the built-in quests, guildmaster locations, and other general lore. All the kinds of things that were once communal knowledge. A lot of the original text files, email chains, and scraps of paper (both real and digital) have since been lost, but the coarse outlines still remained in my head. I decided to take a few evenings here and there and write up guides for the quests I was familiar with. I'll likely break this into several posts given the number of quests and the amount of detail some of them require. All directions are given starting from The Market Square, the lore sections are my own writing, but based on what I could glean from the zones as written.
Lore: From his castle just east of Mozartia’s walls, Lord Darkon leads an army of demons, imps, and other beasts of ill-will. A collection of trinkets has fallen into his possession, and has been distributed among his most trusted generals, lieutenants, and spies. Freduur, a traveling collector of curios, has settled at the Tinker encampment just up the marshy road from Darkon’s keep. These trinkets have piqued his interest, and should someone retrieve the full set of 7 (yellow, orange, red, green, blue, purple, and gold) he has promised a handsome reward.
Spoilers: Notes and Warnings
Notes: General Malak is behind a hidden door named “plaque” very close to the castle entrance. The moss monsters poison frequently, be sure to have some way of removing poison. If you don’t have a way to recall, you can escape from the inner sanctum by pulling the glowing lever in the corner of that area.
Warning: There is one deathtrap inside the castle. At the top of the stairs, after opening the iron door, you must go west (“Junction of Hallways”), south (“A Swampy Hallway”), south (“The Entryway”), west (“Entrance to the Inner Sanctum”)
Warnings: Lord Darkon himself holds the final trinket. He’s only slightly tougher than his flunkies, but has a bad habit of casting teleport when he’s in a pinch, which will move him to a random room in Giovia. This makes completing the quest quite frurstrating as he can end up in a closed zone, high level area, or just.. lost. It’s a good idea to keep him bashed, or better yet have a higher level player kill him in one shot and simply bring you the corpse. The trinkets cannot be dropped, but a corpse carrying a trinket can be transported easily.
Lore: Deep below the sewers of Mozartia, the Labyrinth of Solarn awaits. There are whispers of a horrifying horned beast that preys upon lost adventurers, and of the imprisoned gnomish tinkerer who has promised to fashion a fierce reward should anyone slay the beast and bring him its horns.
Spoilers: Notes and Warnings
Notes: Look for the lettered hall, the first horn is held by the One-Horned Cow, the second can be found inside a pedestal. The tinkerer is in a hidden workshop just off the lettered path to the cow. Be careful about killing the tapestries here; it changes the exits and they don’t respawn until the mud reboots, locking players out of specific bits of the area.
The Shimmering Scarlet Cord
Levels: 50-70 Areas: The Faerie Forest Reward: A shimmering scarlet cord (over-ears, +4 all-stop, -1 all hitrolls, +10 mana) Starting point: 6e,5n,e
Lore: A small village sits south of the faerie forest, and in a humble cottage therein dwells Ferrashynn. This old warrior, retired from the life of combat and conquest, has taken to studying the old myths, believing there to be an entrance to the world of the sun-worshiping druids and old gods close at hand. These same myths live on in the songs of bards; if one could be found their songs might prove very illuminating.
Spoilers: Notes and Warnings
Notes: You’ll need the ability to fly as well as water breathing to complete this quest. Head to the Field of Dreams (6e,5n,3e,3s,2se,ne,n, worship sun, 2sw). In the first room say the words, “dream of dawn”, go up, kill Danu and retrieve his scarlet flower. At various rooms in the looping endless fields, repeat that same pattern for Leanan Sidhe (dead), Cernnunnos (earth), Lugh (harvest), Manannan (sea), the Sea Serpent (well), Brigid (fire), and Belanus (spring). When you have all 8 scarlet flowers, return to the forest and find the bard. Hand the flowers over one at a time to receive your reward.
Warning: The vampiress Leanan Sidhe may drain levels in combat. It’s a good idea to use pets or dispatch her quickly.
The Rough Underwear
Levels: 15-40 Areas: Glades of Serenity Reward: a pair of rough underwear (underpants slot, AC 5 Stop 5, +5 resist fire & lightning) Starting point: 6e,5n,5w,7n,5w,7n,2nw,w,n
Lore: Mysterious magic long ago brought the spark of life to the huge mineral boulders that ages past served as landmarks throughout the glades. Six to be exact. It is said that fragments of their bodies retain significant magical power, but the only artisan who ever learned to harness it, Freeo, was imprisoned by the Dolbarians warrior cult. Rather than attempt to cage someone as crafty as Freeo, they exiled him to a magical prison. Only with the cooperation of many warriors can the portal be re-opened.
Spoilers: Notes and Warnings
Notes: This can be a bit of a pain, since the area is laid out with a few loops in it. The gist is simple enough – slay the six mineral beasts, retrieve the six fragments. Due north from the entrance to the glades you’ll find the charred tree stump. Attempting to sit here will teleport you to the lair of the Dolbarians. Most of them carry a kuruhgerann (a type of coin) with a letter on it, and those letters spell out DUNGEON. The tricky bit is that you only really need one of each of the 7 types, but which ones you get each time you visit varies. Once you have at least one of each of the types, visit the room with Sony, “End of the Line”, and “slot token” until the portal opens. The way this is implemented, it can be a bit buggy – When you enter the command, it spends your tokens in order of letters, meaning you need to spend all your Ds, Us, Ns, Gs, and Es before it will ever spend an O. If you take too long in this process and the zone resets, all the flags are cleared, and you have to start all over again. The best approach is to just have one of each type before starting. Finding Freeo once you’re inside the prison is easy enough, just make sure you really have all six fragments so you don’t have to do it all over again. The beasts are: Muut (clay), Izusu (granite), Silt (quartz), Sheol (marble), Rixon (rock), Zareb (sandstone). They can all be tracked from the main area.
Warning: None!
The Gift of the Woodking
Levels: 60-99 (requires Ranger class) Areas: Moonseeker Forest, Others Reward: The Gift of the Woodking (quiver that fills itself with arrows) Starting point: 13e,3n,2e,n,4e,3s,w,s,w,s,say itooalvera,w,2s,w,8s,e
Lore: Deep in the Forest of the Moonseeker druids sits a shrine to the Woodking Segallion. At this shrine a skilled ranger may seek to be blessed by a gift from the Woodking himself, but be prepared, as no gift from the Gods is given lightly.
Spoilers: Notes and Warnings
Hint: The areas involved are Grant’s Manor, Castle Endor, Tinker Encampment, Dryad Forest, Dwarvenrealm, and The City of Bogg.
Notes: You don’t need to visit the shrine before beginning, you can simply gather the items and hand them over at the end. The request from the shine is thus: “Bring me a locket adorned with hummingbirds, a helm that grants true-seeing, a collar worn by wolves, a sword made of dragonscale, the drums of war, the path to Bloodspur peak, and a jagged left tooth that is an inch and a half long. Place them on this altar, and you will be blessed by a gift from the Woodking himself, and be named a High Ranger of the Woodking.” The locket and staircase cannot be rented, they’ll drop at reception if you do. Items needed are:
Kaythrn’s Locket: Inside the hidden hatch (6w, 2s, e, 3s, w, o bush, 2n)
The Nightcap of Vision: (keyword night-cap) In a dresser in Room 2 of the Inn in Castle Endor
Collar worn by wolves: Found on the silver wolf in the tinker encampment, not 100% (9e, 4s, 5e, then track wolf)
Dragonscale sword: In the Forest of Dryads, on the earth elemental that lives in the secret room inside the Great Oak. (6e,5n, 5w, 18n, nw, 2n, ne, 2e, s, d, sw, e)
Drums of War: In Dwarvenrealm, on the great granite golems in the treasury of House Stonewurt (12e, 5n, 2w, 2s, e, u, 3n, u, pick secret, o secret, n)
Spiral Staircase: Found in the home of Othaar Mindthumper. Not easy to get to, lying deep inside the wilds north of the City of Bogg. You need the weird blue-glowing key that lands on the Dark Messanger, found at the Hair of the Dogg Inn, in the City of Bogg. To the key: 18e, 2se, 13e, 16n, 2w, s, e To the staircase: 18e, 2se, 13e, 21n (north gate), 2n, e, 2n, 2e, 2w, n, 2e, 5n, e (Gad the Unknown), n, e, n, e, n, 2e, n, 3ne, n, 5e, 2n (timed deathtrap!), w, 7u, 5e, n,unl door n, o door, n (avatar master), d, e, pick door, o door, e
Left fang of a hound of Chrelos: This is an incredibly long journey by foot, but thankfully one can teleport or gate to ‘zeptos’, 3e, n.
To reach the shrine and give each of the items to it: 13e,3n,2e,n,4e,3s,w,s,w,s,say itooalvera,w,2s,w,8s,e,4s,e,2w,2nw
The Black Leather Wallet
Levels: 100-115 Areas: The Isle of Cretacia Reward: a black leather wallet (very large capacity container) Starting point: 8w,n,5w,5s,e,*wait*,n,6e,se,5s,e,se,3d,e,n
Lore (help file): Take a step back in time and look through the obelisk of Tima where you will find before you the forgotten world of Cretacia. Long deceased predators of the world come back to haunt the mortals of the land, bringing with them the long forgotten pain of pure predatorial hunger. Any mortal courageous enough to travel through the land of dinosaurs should be warned, this place is not for the faint of heart.
Spoilers: Notes and Warnings
Notes: As soon as you enter the room with the Guardian of the Obelisk, it will offer the quest. If you say the words, “the wallet quest”, and are over lv100, the Guardian of the Obelisk will spawn a dinosaur bone with your name on it somewhere inside the zone. Either by exploring the zone on foot, or by using the locate object spell, simply retrieve the bone and return with it to the Guardian. Almost everything in the zone is particularly weak to electric damage.
Warning: There aren’t any deathtraps in the zone, but the bats can paralyze and several of the dinosaurs hit particularly hard (Kakuru lizards and the Trex come to mind). If you attempt to obtain two wallets, the Guardian will scrap one of them!
Lore (help file): A proof of skill, a passage of right. The able bodied master of combat must survive trial after trial to prove themselves worthy of receiving queen Aerin's reward. Only by collecting the eight baubles and slaying king Conchcobar mac Nessa can one show their worth to the queen.
Spoilers: Notes and Warnings
Shortcut: Gate or teleport to ‘zanc’,s,w,u
Notes: There are eight baubles to collect in order to open the way to Conchcobar mac Neesa, and all of them are hidden inside tortoise shells and locked by acorn keys. Almost every mob in this trial is susceptible to blunt-type damage. The common path looks like this.
In the very first room you defeat Cu Roi, take the acorn from his corpse and go to the hidden room to the east. Unlock the shell, open it, and claim the bauble. Proceed north from Cu Roi’s room to The Gathering, this will be the common center of the trails.
The second target is Puca, who wanders. ‘where puca’ will tell you if he’s wandered off into the Pain and Pleasure Filled Chambers, or is still at Puca’s Playground. The playground is 3w from the Gathering, the Chambers are 6w. Find puca, kill him and take the key. If you end up in the Chambers you can only recall from the east-most room, rush back to the Trials to make sure they don’t respawn in between. With the key in hand, go 3w, s from the Gathering to find the shell, retrieve bauble #2. Sometimes this shell isn’t locked, so check it first.
Next up is Diancecht, 3e from The Gathering. You can leave him for later if you want to buy healing from him between fights, but it’s usually not necessary. His treasure room is NE of him, retrieve bauble #3.
6e from The Gathering you’ll find Lord Eriu, get his acorn. To access his treasure room we’ll need to open it remotely. Return to The Gathering and go 4w, 2n to Cathbad’s Grove and ‘look living’. Return to Eriu’s room and go ne, e and retrieve bauble #4.
From that shell go w, nw and fight Findabair. She doesn’t hold an acorn, but won’t let you pass until she’s defeated. Go northwest and defeat the undead Ith (moon ray, sun ray, etc work very well), again no key from him. Northwest once more and fight Macha, who does hold an acorn. In this room you can ‘unlock portal nw’ and proceed to Morrigan’s room. Defeat her and go north to her treasure room for bauble #5.
In Morrigan’s room use the emote ‘sing’ to open a portal we’ll need for the next steps and return to The Gathering. From there go 3n and fight Conla, her treasure room is west from her, retrieve bauble #6.
Clidona is 6n from The Gathering, her treasure room is north from her room. Retrieve bauble #7.
Finally, from Clidona’s room go ne, ne, se, ne to find king Conchobar mac Nessa who holds the final bauble. Once you hold all eight in your inventory, go east to receive your reward!
Warning: Going off the prescribed path there are many deathtraps, no-recall rooms filled with very dangerous mobs, and other general nastiness. King Conchobar mac Nessa hits significantly harder than other mobs in this zone, so be sure to have your defenses in order.
The Power of Inarh
Levels: 130-150 Areas: The Graveyard of Kings Reward: Permanent aura providing the 'Summon' command for players Starting point: 6w,2s,e,5s,se,5s,w,sw
Lore (Thousat-Tia): Welcome adventurer, to the graveyard of the great kings of Inarh. I am Thousat-tia, guardian of the spirits who take residence in this graveyard. Many many years ago, a great magician, Verendrad, brought to the kingdom of Inarh an extraordinary gift, an ability which was passed down the line of kings. This ability allowed them to summon from any point in the world one of their allies to assist in combat. However, due to requiring long distances, this drained the power of the kings and was thus only able to be used in limited fashion.
Having resided in the graveyard for many many years now watching over the spirits, I have been granted this ability myself. Eight of the great spirits have given me the authority to pass on the gift to whomever they see to be a valiant warrior. Fight the eight without the aid of fellow travelers or assistance from any other being and they may give you their blessing, return to me once you have this and I shall pass the gift on to you.
Farewell and good luck, adventurer.
Spoilers: Notes and Warnings
Shortcut: Teleport or gate to ‘shade-mont’ and go sw.
Notes: In order to be granted the Power of Inarh one must, in single combat (so without pets or other players helping) defeat the eight ghostly kings of old Inarh. Notably you don’t need to kill Oroede. When one enters the zone they’re dropped at the Center of the Graveyard. From here one can go in any direction three times in a row and find themselves at one of the eight tomb. Each tomb is opened by worshipping the proper king, and hints as to the appropriate name are scattered in the room. Each ghostly king inflicts different damage types, the full list looks like this:
NW – Raldt – fire damage
W – Inarhin – electric damage
SW – Broenthoves – colour damage
S – Nadaugh – cold damage
SE – Enth-an – air damage
E – Que’tor – air damage
NE – Bel’mos’oind – acid damage
N – Brienroth – cold damage
As each ghost dies there is a chance to be granted their blessing. It will likely require several visits to the zone to get the full set. When you have all eight, return to the Center of the Graveyard and dig down using a shovel or passwall spell. Below you’ll find Thousat-Tia, who will grant you the power of Inarh.
Warning: When you’ve defeated all the kings, a magical seal opens in Brienroth’s tomb allowing passage north toward the Tomb of Oroede. Just beyond the seal, there is a deathtrap northwest. To face Oroede open the door and go northeast instead.
Our pattern seems to be that we go on one big vacation each year, and in late November 2019 we went for a diving trip to Curaçao and Bonaire, in the Dutch Antilles. It was surprisingly affordable to get there, though the flights were long and I learned I can't handle a red-eye like I used to. Last time I put in some extra effort to break the videos up by location, this time it was hard enough to find time to do editing at all, so instead I stopped with a large, vaguely chronological, mass of footage with a few labels thrown on. This trip was easily the best (and warmest) diving I've ever done, and I'd happily return for another visit given the opportunity!